Home | Tutorial Index | Patterns
Pleat Construction
Pleats in your knitting are easier to work than you think. Working it is much like working a 3-needle bind-off. You can fold a pleat in 2 directions: as a “Z” or “S”. In a “Z” pleat, you fold the fabric as if you were writing the letter “Z” and the top edge of the pleat points to the left. In an “S” pleat, you fold the fabric as if you were writing the letter “S” and the top edge of the pleat points to the right.
You can combine your pleat folds in a number of ways to make different types of features for your designs. In knitting, the most common types of pleats are accordian, box and inverted box pleats.

Accrodian pleats are formed by creating a series of “S” or “Z” pleats that point towards one direction. An example of an accordian pleat is a folding fan.

Box pleats are created by placing a “Z” pleat and an “S” pleat next to one another. A common application of the box pleat can be found in the back of men’s dress shirts.

Inverted box pleats are created by reversing a box pleat and the placement of the “Z” and “S” pleats are reversed. A common application of an inverted box pleat can be found in women’s skirts.
Pleats in Knitting
My favorite kind of pleat is the inverted box pleat. I prefer it because I think it looks the neatest and in it looks the most slimming. I’ve used pleating in a couple of my designs. The most recognizable is design in which I use an inverted pleat is probably Issara, which was published in the Fall 2010 issue of Twist Collective.


Working a “Z” Pleat
Your knitting instructions should tell you how to fold your needles and how to work your pleat. Generally, in the majority of cases, you will be folding and working your pleat on the right side rows. Your instructions will instruct you to place X number of stitches on one double-pointed needle (dpn) and Y number of stitches on a second dpn.

Step 1: Place X sts on dpn 1 and place Y sts on dpn 2.


Step 2: Turn dpn 2 around 180 degrees clockwise. Maneuver dpn 1 towards the turned dpn 2 so that the wrong sides (nonpublic) of the fabric between dpn 1 and dpn 2 are facing each other. Dpn 1 should be in front, with dpn 2 sandwiched in the middle, and the left hand (LH) needle in the back.


Step 3: Insert RH needle through the first stitch of dpn 1, dpn 2 and the LH needle. Knit all three of these stitches together and drop them off their respective needles.


Step 4: Finish working across pleat by repeating step 3 until all the stitches from the dpns are consumed. (Sometimes, your knitting pattern may have slight variations to theses instructions. For example, in Issara, there’s a set up row prior to the pleat-folding and slight modifications in working the pleat together. However, the pleat folding and basic construction is the same.)
Working an “S” Pleat
Your knitting instructions should tell you how to fold your needles and how to work your pleat. Generally, in the majority of cases, you will be folding and working your pleat on the right side rows. Your instructions will instruct you to place X number of stitches on one double-pointed needle (dpn) and Y number of stitches on a second dpn.

Step 1: Place X sts on dpn 1 and place Y sts on dpn 2.


Step 2: Turn dpn 2 around 180 degrees counter clockwise. Maneuver dpn 1 towards the turned dpn 2 so that the wrong sides (nonpublic) of the fabric between dpn 1 and dpn 2 are facing each other. The left hand (LH) needle should be in the front, followed by dpn 2 in the middle, and dpn 1 in the back.


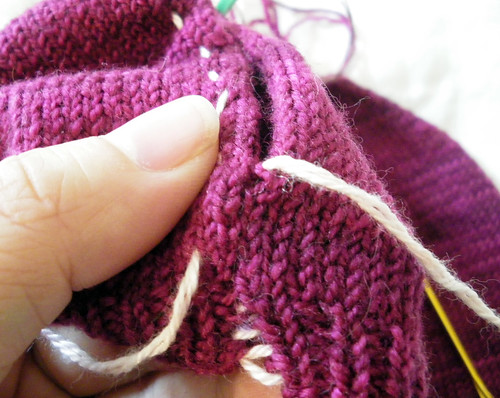
Step 3: Insert RH needle through the first stitch of the LH needle, dpn 2 and dpn 1. Knit all three of these stitches together and drop them off their respective needles. The right photo shows the side view of knitting the stitches from the LH, dpn 1 and dpn 2 together.

Step 4: Finish working across pleat by repeating step 3 until all the stitches from the dpns are consumed. (Sometimes, your knitting pattern may have slight variations to theses instructions. For example, in Issara, there’s a set up row prior to the pleat-folding and slight modifications in working the pleat together. However, the pleat folding and basic construction is the same.) The above photo shows a finished “Z” pleat (a left facing pleat on the right side of the photo) and an “S” pleat (a right facing pleat on the left side of the photo). Together, these two pleats form an inverted box pleat.
Check out some of my patterns!


Thank you! Thank you! Thank you! This will help me sooooo much!
Thank you for showing me how to knit a pleat.It’s nice to have pictures.I need to just practice.
Hello, thanks so much for the excellent guide ! I created a pleat like this, and then I tried to create it in the reverse, and it was a nightmare ! (Basically I created two stitches into each then put them on two separate parallel cable needles, and then I knit the zig-zag using cable needles for several rows till it was stretchy enough to put back on the normal needle. Is there an easier way to do this ? Do you have any suggestions? Ginny
Is there a way to make the knitted progect “easy to pleat”?
I found a trick of dropping a stich after the length is compleated for the inner (unsean) parts of a pleat, but no trick to fold better, in the upper side of the fold
Thank you so much for this tutorial. I love how you explain the pleats and have used your post several times. Unfortunately most of the pictures are not available from Flickr anymore. Could you please have a look into why to pictures aren’t showing up? Again a big thank you for posting.
Thank you for this tutorial. I haven’t tried to knit a pleat yet, but now I want try. I also would like to let you know that on my computer, most of the pictures are not visible. There is just a Flickr place-holder that says the picture is not available. I don’t know if that is because of my computer or your blog. 🙂
This is exactly why I’m going to load all of my pics on an external hd! Flickr did this to me also!
wow, all the photos are no longer available. I sure hope that I can follow the instruction without them.
ohhh and the photos??? great tutorial anyway!
This is the proper blog for anyone who desires to seek out out about this topic. You realize so much its almost laborious to argue with you (not that I truly would need…HaHa). You undoubtedly put a brand new spin on a subject thats been written about for years. Great stuff, simply nice!
Would love to see the photos and to read more articles by you, see more patterns by you. Where can I find them?