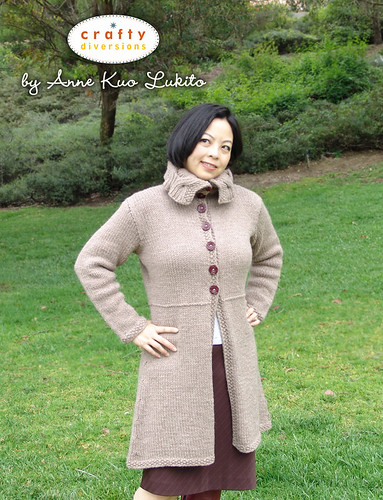
I know I promised this post a while back, but better late than never, right? Here are some ideas and tips for customizing your Issara.


Blocking:
Issara is rather bulky and heavy, which can make blocking challenging, especially with the pleat. Before wet blocking, I suggest basting the pleat closed and in place with a high contrast waste yarn. Then, to shorten your blocking time by several days, I would put it in your washer on spin cycle. Do not actually run it through the washing machine. Once your machine has done all the work of sucking off the excess water, you can block the coat as you would normally do.
I was a bit impatient when blocking the sample, especially for the stubborn pleat, which remained damp when other parts of the coat had dried. This is due to the thickness of the multiple layers. Thus, I sped up the process in the pesky areas with a hairdryer. You can also face a fan towards your garment, which will shorten the overall time considerably.
After the coat had dried both naturally and with the help of my handy hairdryer, I fine-tuned blocking some of the other elements, such as the pleat and the edging, with my steam iron. When you steam-block with an iron, make sure that you are not touching your garment with the iron, especially if your yarn contains synthetic fabrics. You don’t want to melt your yarn! Instead, hover above your garment by about 0.5″ to 1″.
Adding More Waist Details:
If you would like to add a more substantial and visual waistline than the single purl ridge, then I’d suggest omitting the purl ridge and instead, work in about 4-5 rows (or more, if desired) of seed stitch right after the folding of the pleat. You can also do a reverse Stockinette stitch band, though I think doing the seed stitch will be more unifying design-wise with the rest of the garment.
If you’d like to add a belt that’s 1.5″/ 4cm wide, CO 5 sts. Row 1: Sl1, [k1, p1] twice. Repeat Row 1 until desired length and BO. Then, for the belt loops, I’d crochet 3 or 4 chains that are a little longer than the width of the belt and attach the loops right above or over the waist ridge. Don’t forget that you’ll need to allot extra yarn for this.
Shortening the Coat:
If you’re a bit short, or would just like a shorter coat, the best way is to reduce the number of Stockinette stitch rows between the skirt shaping. The gauge works out to 4.5 rows per 1″/ 2.5cm. Thus, if you’d like your coat to be 2″/ 5cm shorter, then I would omit 8 or 10 St. st rows in the skirt. I would disperse throughout the skirt to maintain the gradual A-line shape.
If I had more ample assets in the hip area as well, I’d probably work the omissions closer to the top of the skirt. This way, I’m shorting the skirt, but also do so in a way that gives my hips more room. For example, if I was working size 39 3/4, instead of working the Decrease row every 10 rows in the 6th and 7th repeat, I’d work the Decrease row every 6 rows.
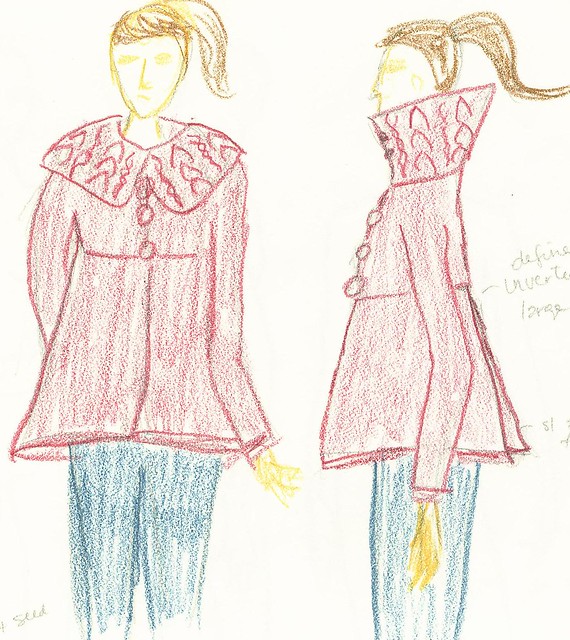
Making it a Jacket:
I you are in a warmer climate or just prefer a jacket over a coat, you can omit the pleat and make it a shorter, hip-length jacket. The following instructions will get you a jacket that measures about 5.25″/ 13.5cm below the waistline of Issara, which would give you a length of 17.25 (17.5, 18.25, 18.75, 19.25, 20.25, 20.5) from shoulder to hem. Of course, you should modify it further as desired to accommodate your needs and preferences.
CO 125 (133, 137, 149, 153, 161, 169)
Set up 1 (WS): Sl1, [p1, k1] to last st, p1.
Set up 2 (RS): Sl1, [k1, p1] to last st, k1.
Rep Set up rows 1 and 2 again.
Using removable markers, place marker after the first and last 31 (33, 34, 37, 38, 40, 42) sts.
Row 1 (WS): Sl1, [p1, k1] twice, purl to last 4 sts, [k1, p1] twice.
Row 2 (RS): Sl1, [k1, p1] twice, knit to last 4 sts, [p1, k1] twice.
Rep Row 1.
Dec Row: Sl1, [k1, p1] twice, knit until 2 sts before marker, ssk, sm, k2tog, knit until 2 sts before next marker, ssk, sm, k2tog, knit to last 4 sts, [p1, k1] twice.
Work as established, working Dec Row every 6 rows 3 more times. – 109 (117, 121, 133, 137, 145, 153) sts.
Next (Waist Ridge, WS): Sl1, [p1, k1] twice, knit to last 4 sts, [k1, p1] twice.
Next: Rep previous row.
Work Bodice and the rest of the of Issara as instructed in the pattern.
Tutorial & FAQ:
In case you are not aware, I try to post tutorials/FAQ pages for many of my patterns, especially those that require some special, unusual or more intermediate techniques. Click here for an index of all the tutorials on this site. Click here for the Issara tutorial/FAQ. If you have a question that’s not addressed in the tutorial, you can post your question in the comments or go to my Ravelry group.
Read Full Post »